"Are we having cake for lunch?" someone curiously inquired in the house upon hearing this word for the first time.
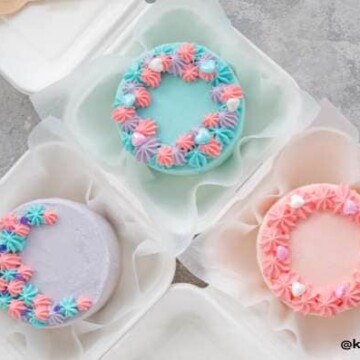
I decided to try out these Korean lunchbox cakes for the little ones. These adorable little confections have their origin in Korea.

Jump to:
Why This Recipe?
They fit in a lunchbox; approximately 5 inches in height, making them so easy to transport.
These pretty mini cakes are getting popular all around the world. They are a perfect gift to loved ones, colleagues, or kind service people such as an extraordinary doctor, nurse, a teacher, or even a policeman!
These small cakes are a great way of making the perfect size gifts with a cute message for a loved one.
The cakes can be eaten while still in the takeout boxes; the box acts as a plate! Just pack some disposable forks and knives in small packages or lunch bags and enjoy a picnic with your family.
These adorable mini lunchbox cakes are being experimented with by bakeries and home chefs as they make perfect gifts for special occasions. We have compiled a step-by-step tutorial for you; why don't you try this tiny cake recipe?
Ingredients And Substitutions

Brown Sugar
This is the best for this recipe as it contributes to a nice, soft crumb and gives an excellent brown hue. In addition, the molasses adds a caramel-like flavor. You can still use granulated or confectioner sugar if you do not have brown sugar.
All-purpose flour
It is the regular flour that you need for this recipe. You can substitute all-purpose flour with cake flour.
Cocoa powder
The powder gives a rich chocolatey flavor; I used regular Dutch-processed cocoa powder.
Eggs:
large eggs are at room temperature and are the best ones weighing an average of 50 to 60 grams. Eggs moisturize the cake batter.
Equipment

- Mixing bowls
- Rubber spatula
- Offset Spatula
- Bench scraper
- Electric mixer or stand mixer
- Kitchen weighing scale
- Cookie cutters
- Sheet pan or silicone cake molds
- Cooling rack
- Pastry brush
- Parchment paper, plastic wrap, and aluminum foil
- Carry out lunch boxes (aluminum and paper)
- Wooden skewers, sharp knife
- Turntable
- Piping bag
- Bench Scraper
- Various nozzle tips for decorations
- Oven

Filling
You can use your favorite jam or preserve or even fresh fruit slices! The choice is yours as you finalize these tiny dainties!
Sugar Syrup
1 cup of water
1 cup of granulated sugar
Flavorings (Optional)
1. In a saucepan, add water and sugar. Bring the mixture to a boil, and stir until all sugar is dissolved.
2. Let the syrup cool. Your simple syrup is ready to be used!
Frosting And Decoration

Frosting and decorating are the best part of making these mini Korean lunch box cakes.
After one hour, place the cakes from the freezer on the turntable; put a dollop of buttercream on the turntable.
Place the first layer of the Korean Lunch Box cakes on top of the buttercream to hold the cake in place. Apply some sugar syrup with a pastry brush or a sprinkling bottle.
Apply some buttercream, creating a dam to prevent the filling from spilling. Add some filling in the middle of the mini cake and place the other layer of the cake.
As you would for a regular-sized cake, apply a thin crumb coat and keep the cakes in the fridge for about 15 minutes as you assemble all the other little cakes.

Once the crumb coat is set, return the hand-sized cake to the turntable. Apply the final coat of buttercream on the entire cake and neaten it with an offset spatula.
Divide the buttercream into separate small bowls, and add the gel color as desired. Mix to get your desired hues, and add the buttercream to the piping bags. Decorate as desired with the nozzle tip of your choice.
Begin to decorate your small sweet treats as you want to. An opportunity to share kind messages, make someone smile, etc!!
Carefully lift these cakes into parchment-lined carry-away lunch boxes.

Easy Mini Lunch Box Cakes
Suppose you want to decorate in a different method than the one mentioned above.
In that case, you could probably be in a hurry … pipe some buttercream frosting into a square or rectangular take-out lunch box (aluminum foil or styrofoam), place a layer of cake, filling, then another layer of cake until you have all the cake layers you need. Pipe more cream onto the cake, and
smoothen it with an offset spatula. Pipe your fancy decorations on the Korean Bento Cakes with your colored buttercream.
Share cute lovely messages to your friends or family on these adorable lunch box cakes or enjoy this cute bento cake recipe with your family.

FAQ
These adorable little cakes were popularized in Korean cafes and restaurants during the pandemic.
They are way smaller than regular cakes. The gathering restrictions reduced crowd size on special occasions, lowering the demand for
regular-sized cakes. They also used these mini-sized cakes to share cake and cheery messages during sad times.
Bento is the name for a classic wooden lunch box in the Japanese language. The tiny cakes are also known as Bento Lunch Box Cakes.
You can use a sheet pan cake that gives you a cake that is one inch tall. Once the sheet pan is cooled, you can use a cookie cutter to cut out your desired shapes.
An easier way is to use silicone molds of the right size and shape for baking the Korean Lunch Box Cakes.
Pro Tips

Once the cakes have completely cooled on the cooking rack, wrap them in two plastic wraps followed by aluminum foil and place them in a freezer for an hour.
This step will reduce the crumbs and make it easy when carving or cutting the cakes. If the cakes are warm, the frosting will melt, and the cakes will not be neat.
When applying the final coat of buttercream, dip your bench scraper and offset spatula in warm water. Wipe the scraper with a towel and use it to remove the extra buttercream.
Always let your warmed bench scraper touch the board as you rotate the cake on the turntable. This action gives you smooth edges on your adorable petite cakes.
While baking, prepare the buttercream, a great part of the Korean lunch box cakes.
To give the mini cakes their dreamy color palette, you need buttercream and a range of gel food colors. We shall use colored buttercream to finish the eye-catching petite cakes.
Related Posts
If you tried this Korean Lunch Box Cakes Recipe or any other recipe on my website, please leave a 🌟 star rating and let me know how you liked it in the 📝 comments below. Thanks for visiting!

Korean Lunch Box Cakes
Equipment
- Mixing bowls
- Rubber Spatula
- Offset Spatula
- Bench scraper
- Electric mixer or stand mixer
- Kitchen weighing scale
- Cookie cutters
- Sheet pan or silicone cake molds
- Cooling rack
- Pastry brush
- Parchment paper, plastic wrap, and aluminum foil
- Carry out lunch boxes (aluminum and paper)
- Wooden skewers, sharp knife
- Turntable
- Piping bag
- Bench scraper
- Various nozzle tips for decorations
- Oven
Ingredients
- 225 grams Unsalted butter
- 200 grams Sugar
- 250 grams All purpose flour
- ¼ teaspoon Salt
- ¾ or 65g cup Cocoa Powder
- 1 ½ teaspoon Baking Powder
- ½ teaspoon Baking soda
- ¼ cup or 60ml Brewed coffee
- ¾ cup or 180ml Buttermilk
- 4 Large Eggs
- 2 teaspoon Vanilla extract
Buttercream Ingredients.
- 1 cup Salted butter
- 3 tablespoons Whipping cream
- 4 cups Powdered sugar
- 1 teaspoon Vanilla extract
- Your choice of Gel food color
Instructions
- Preheat the oven to 150F; if you are using a tray for baking the cakes, grease the baking sheet with a spray or butter, lightly flour, and line it with parchment paper.
- Sift the flour, cocoa powder, baking powder, soda, and salt into a mixing bowl.
- In the bowl of a stand mixer with the paddle attachment, cream the butter and sugar until soft and fluffy. Add an egg while beating until all ingredients are thoroughly combined.
- Add in a third flour mixture, then beat at medium speed; add half of the buttermilk, then continue to beat. Continue alternating the flour mixture with the buttermilk and the brewed coffee.
- Pour the cake batter into the silicon molds or on the sheet pan and bake for 30 to 35 minutes till a skewer inserted comes out clean.
- Place the cakes in pans to cool on the wire rack for 10 minutes. Remove them from the tin and cool them on the wire racks. 7. Wrap the cakes with two plastic wraps, then aluminum foil. Keep them in the freezer for an hour before frosting.
- If you baked the cakes on a sheet pan, use a cookie cutter to cut out your desired tiny shapes, then freeze for an hour before frosting.
Buttercream Recipe
- Add the slightly softened butter to the mixing bowl alongside the vanilla extract.
- Mix the butter and vanilla until they are thoroughly combined for two minutes. This step ensures a richly flavored vanilla buttercream.
- Scrape off the bowl with a rubber spatula and add the measured powdered sugar.
- Mix at low speed for 30 seconds until sugar and butter are incorporated; scrape the bowl and increase the speed to medium-high speed until light and fluffy.
- If your buttercream has a few crumbs, add whipped cream and beat again to make the perfect whipped cream frosting.


